Preserving Herbs for Winter Use
Preserving Herbs for Winter Use
By Cathy Manus-Gray
My food dehydrator has served as my best friend during many growing and harvesting seasons. It is a valuable tool in preserving herbs for culinary and medicinal use through the late fall and winter months. Some herbs are better fresh or frozen, but for those I dry in quantity, the dehydrator is quick and easy, and takes less space than traditional drying methods.
In general, the quicker an herb is dried at a low temperature, the better the flavor and nutrient value will be. The use of dehydrators is not necessarily superior to other methods of drying herbs, but dehydrating herbs is an easier alternative which provides similar flavor results compared to that of air-dried herbs.
How it works A dehydrator works by extracting moisture from the leaves. Herbs that have a high water content such as mints, especially applemint and spearmint, take longer to dry. Some dehydrators have temperature guides. Herbs should be dried at about 100°F. At higher temperatures, the essential oils and vitamins break down.
You can spend less than $25 or up to a few hundred dollars, depending on the features of the machine you choose. If you plan to use it a lot, a higher-priced machine may be worth the investment because it will allow you to dry more herbs in less time. The highest-quality machines have a heating element and a fan to circulate air through the trays, providing a more even drying environment and quicker drying time. Lower-priced machines have a heating element but no fan, relying instead on convection (the normal flow of warmer air rising and cooler air sinking) to circulate the air.
Preparing and drying Dehydrating herbs is quicker and requires less space than hanging herbs to dry or laying them out on screens or racks. Most herbs will dry within four hours and can then be stripped from the stems and stored immediately. With a dehydrator, you can dry as many different types of herbs at one time as you have trays for. The flavors do not mingle during the drying process.
Preparing the herbs for drying is similar to other methods in that you will need to gently wash the plants and pat them dry. Most of the surface moisture should be removed before they are placed in the dehydrator. Small leaves can remain on the stems for drying, then stripped off when you’re ready to store them, but removing large leaves from thick stems will cut the drying time.
If you plan to dry roots such as horseradish, scrub them to remove the dirt and then peel the outer layer. Slice them into 1/4- to 1/2-inch pieces. Then dry the roots until they are hard, which takes six to ten hours. Prepare and dry the pungent horseradish root in a garage or other out-of-the-way area because of the strong aroma.
When placing herbs on trays, leave space between them to provide ample air circulation. Keep track of which herbs you’ve placed in each tray. Once they’re dried, it’s more difficult to distinguish between them, especially if you’re drying more than one variety of an herb.
If you are drying seed heads, line the drying trays with cheesecloth to catch any loose seeds. This method is also useful for flowers that may drop their petals as they dry.
Drying The chart on page 34 provides general guidelines for drying times using a basic dehydrator that relies on convection. The length of the stems is noted because this will influence drying time. If the leaves are large enough not to fall through the holes in your dehydrator’s tray, you may choose to strip leaves off of thick stems that won’t be used. Other factors that have an influence are the amount of humidity in the air, air circulation, the amount of water content in the herb, and the air temperature inside the unit. Follow the manufacturer’s instructions for drying times.
Check the plants often for dryness so they do not remain in the dehydrator longer than necessary. Trays should be checked every two hours and rotated periodically in a dehydrator that relies upon only a heating element. This allows for more even distribution of heat among the stems. Once the leaves are crisply dry, remove them and strip the leaves from the stems without crumbling the leaves, if possible. If leaves are not completely dry, mold may develop once they are stored.
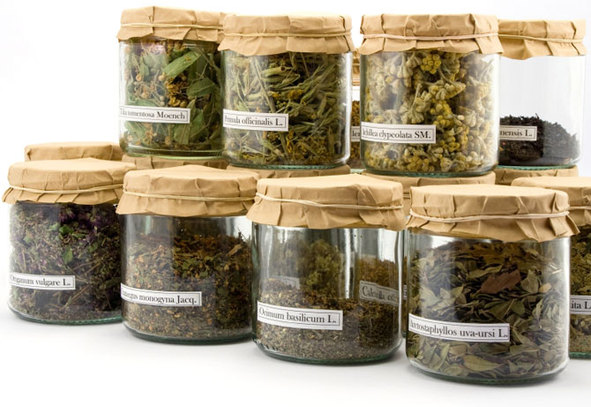
Leaves will retain their freshness when stored whole in an airtight glass jar. Place the container out of direct sunlight and away from heat and humidity. Don’t forget to label the contents and add the date, too. Dried herbs should be used within one year.
In many cases, fresh herbs are preferred over dried for culinary purposes. Some herbs, however, hold their flavor well in drying and are easily substituted for fresh in recipes; these include oregano, rosemary, sage, thyme, and some of the mints. Creating blends to add to soups, stews, and sauces in winter cooking is an easy way to use dehydrated herbs. Dried herbs may also be used for herb-infused oils and vinegars when fresh herbs are not available, or if you don’t have time to make them when the season still allows you to clip them fresh from your garden. Consider adding your dried herbs to butter, cream cheese, or Dijon mustard for a bit of flavor on bagels or sandwiches.
Experiment with your dehydrator. You will be rewarded during the winter months when few fresh herbs are available and you have a bit of your herb garden on the shelf.
Cathy Manus-Gray is an herbal educator and freelance writer who lives, works, and plays at Herban Gardens, an oasis in the city of Cuyahoga Falls, Ohio.
DRYING TIPS Putting herbs in an oven with the temperature set at 250°F is not a good idea. High heat is damaging to herbs because it breaks down their essential oils. Less expensive dehydrators don’t necessarily heat too high, but they provide less control over temperature. This requires more observation to assure that the herbs aren’t left for hours and not removed immediately when they are dried. As with any dehydrator, spend some time getting to know how the machine works. For example, in my machine I know that the center and outer edges tend to take longer to dry. Therefore, I must rotate herbs appropriately.
SELECTING A DEHYDRATOR If you plan on investing in a higher-priced machine, find out how much noise and heat it produces and make sure that it has a temperature control. Some machines can accommodate up to twenty trays, but they take up more space. With the higher-priced machines, it’s good to test them before you buy, or make sure you can return it if you don’t like it. Some of the more expensive models may be better suited to drying meats and fruits. That means they often have a higher level of heat output and stronger fans that may not be suitable for drying herbs (unless, of course, it also has a low setting specifically designed for herbs).
Resource Kitchen Krafts
PO?Box 442-HC01
Waukon, IA 52172-0442
(800) 776-0575 begin_of_the_skype_highlighting (800) 776-0575 end_of_the_skype_highlighting
www.kitchenkrafts.com
RECIPES Citrus and Lemon Verbena Body Splash Makes 2 cups
For a refreshing garden scent, spritz this blend on for a cooling sensation. If you prefer a stronger scent, consider adding 5 to 10 drops of orange, lemon, lime, and/or grapefruit essential oils.
Peel of 1 orange (preferably organic)
Peel of 1 lemon (preferably organic)
1 cup dried lemon verbena leaves
21/4 cups vodka
Place the orange peel, lemon peel, and dried lemon verbena in a quart-size glass jar. Slightly crush the peels and leaves to release their essential oils. Cover the plant material with the vodka. Steep for at least two weeks, shaking occasionally. Strain into a clean glass jar and discard the peels and herbs. Pour liquid into a glass spray bottle to use as a body splash, or add 1 cup to bath water for a refreshing wintertime bath. (Note: If essential oils are included, shake the bottle prior to each use to distribute them. If you have sensitive skin, do a skin patch test for sensitivity.) Store in the refrigerator and use within two months.
Spicy Licorice Tea Blend Makes 1 cup
While this recipe contains no licorice, the flavor contained in the following herbs is delightfully strong when they are crushed and combined.
2 teaspoons dried anise hyssop leaves, crushed
1 teaspoon dried fennel or anise seed, crushed
1 teaspoon whole allspice berries, crushed
Combine ingredients and place in a glass measuring cup. Cover with 1 cup of boiling water. Cover cup and steep for 3 to 5 minutes. Strain out herbs and spices. I enjoy this unsweetened, but you may want to add a bit of stevia or honey.
Calendula-Infused Oil Makes about 2 cups
This oil may be used directly on the skin as a base for salves and creams, as a carrier oil for essential oils, or as a massage oil. Apply directly to the face (or other parts of the body) or add up to 1 tablespoon to the bath to ease dry skin.
2 cups oil such as almond, olive, or jojoba
1 cup dried calendula flower petals
1 capsule vitamin E (400 IU)
Combine oil and dried calendula petals in a glass or stainless steel pot. Warm over low heat, being careful not to burn the oil. Heat for approximately 30 to 40 minutes. Cool and then strain. Discard the flowers. Add vitamin E as a preservative. Label with contents and date. Store in a dark pint-size bottle in the refrigerator. Use within six months.
Herbal Rub for Poultry Makes about 2 tablespoons
A great way to serve a tasty meal and make use of the dehydrated herbs from your garden is with these seasonings. The 2 tablespoons provides plenty of seasoning for a small chicken or other poultry as a main dish. Garnish with vegetables and enjoy.
1 tablespoon dried lemon thyme
1 teaspoon dried sage
1 teaspoon dried rosemary
1 teaspoon black pepper
1/2 teaspoon sea salt
1/4 teaspoon garlic powder
Slightly crush the herbs using a mortar and pestle. Combine all the ingredients and store in an airtight container. To use, wash the poultry and pat it dry. Lightly oil the surface. Sprinkle 1 to 2 tablespoons (to taste) per pound, and rub it in. Let stand loosely covered for 1 hour or more in the refrigerator before cooking.
My food dehydrator has served as my best friend during many growing and harvesting seasons. It is a valuable tool in preserving herbs for culinary and medicinal use through the late fall and winter months. Some herbs are better fresh or frozen, but for those I dry in quantity, the dehydrator is quick and easy, and takes less space than traditional drying methods.
In general, the quicker an herb is dried at a low temperature, the better the flavor and nutrient value will be. The use of dehydrators is not necessarily superior to other methods of drying herbs, but dehydrating herbs is an easier alternative which provides similar flavor results compared to that of air-dried herbs.
How it works A dehydrator works by extracting moisture from the leaves. Herbs that have a high water content such as mints, especially applemint and spearmint, take longer to dry. Some dehydrators have temperature guides. Herbs should be dried at about 100°F. At higher temperatures, the essential oils and vitamins break down.
You can spend less than $25 or up to a few hundred dollars, depending on the features of the machine you choose. If you plan to use it a lot, a higher-priced machine may be worth the investment because it will allow you to dry more herbs in less time. The highest-quality machines have a heating element and a fan to circulate air through the trays, providing a more even drying environment and quicker drying time. Lower-priced machines have a heating element but no fan, relying instead on convection (the normal flow of warmer air rising and cooler air sinking) to circulate the air.
Preparing and drying Dehydrating herbs is quicker and requires less space than hanging herbs to dry or laying them out on screens or racks. Most herbs will dry within four hours and can then be stripped from the stems and stored immediately. With a dehydrator, you can dry as many different types of herbs at one time as you have trays for. The flavors do not mingle during the drying process.
Preparing the herbs for drying is similar to other methods in that you will need to gently wash the plants and pat them dry. Most of the surface moisture should be removed before they are placed in the dehydrator. Small leaves can remain on the stems for drying, then stripped off when you’re ready to store them, but removing large leaves from thick stems will cut the drying time.
If you plan to dry roots such as horseradish, scrub them to remove the dirt and then peel the outer layer. Slice them into 1/4- to 1/2-inch pieces. Then dry the roots until they are hard, which takes six to ten hours. Prepare and dry the pungent horseradish root in a garage or other out-of-the-way area because of the strong aroma.
When placing herbs on trays, leave space between them to provide ample air circulation. Keep track of which herbs you’ve placed in each tray. Once they’re dried, it’s more difficult to distinguish between them, especially if you’re drying more than one variety of an herb.
If you are drying seed heads, line the drying trays with cheesecloth to catch any loose seeds. This method is also useful for flowers that may drop their petals as they dry.
Drying The chart on page 34 provides general guidelines for drying times using a basic dehydrator that relies on convection. The length of the stems is noted because this will influence drying time. If the leaves are large enough not to fall through the holes in your dehydrator’s tray, you may choose to strip leaves off of thick stems that won’t be used. Other factors that have an influence are the amount of humidity in the air, air circulation, the amount of water content in the herb, and the air temperature inside the unit. Follow the manufacturer’s instructions for drying times.
Check the plants often for dryness so they do not remain in the dehydrator longer than necessary. Trays should be checked every two hours and rotated periodically in a dehydrator that relies upon only a heating element. This allows for more even distribution of heat among the stems. Once the leaves are crisply dry, remove them and strip the leaves from the stems without crumbling the leaves, if possible. If leaves are not completely dry, mold may develop once they are stored.
Leaves will retain their freshness when stored whole in an airtight glass jar. Place the container out of direct sunlight and away from heat and humidity. Don’t forget to label the contents and add the date, too. Dried herbs should be used within one year.
In many cases, fresh herbs are preferred over dried for culinary purposes. Some herbs, however, hold their flavor well in drying and are easily substituted for fresh in recipes; these include oregano, rosemary, sage, thyme, and some of the mints. Creating blends to add to soups, stews, and sauces in winter cooking is an easy way to use dehydrated herbs. Dried herbs may also be used for herb-infused oils and vinegars when fresh herbs are not available, or if you don’t have time to make them when the season still allows you to clip them fresh from your garden. Consider adding your dried herbs to butter, cream cheese, or Dijon mustard for a bit of flavor on bagels or sandwiches.
Experiment with your dehydrator. You will be rewarded during the winter months when few fresh herbs are available and you have a bit of your herb garden on the shelf.
Cathy Manus-Gray is an herbal educator and freelance writer who lives, works, and plays at Herban Gardens, an oasis in the city of Cuyahoga Falls, Ohio.
DRYING TIPS Putting herbs in an oven with the temperature set at 250°F is not a good idea. High heat is damaging to herbs because it breaks down their essential oils. Less expensive dehydrators don’t necessarily heat too high, but they provide less control over temperature. This requires more observation to assure that the herbs aren’t left for hours and not removed immediately when they are dried. As with any dehydrator, spend some time getting to know how the machine works. For example, in my machine I know that the center and outer edges tend to take longer to dry. Therefore, I must rotate herbs appropriately.
SELECTING A DEHYDRATOR If you plan on investing in a higher-priced machine, find out how much noise and heat it produces and make sure that it has a temperature control. Some machines can accommodate up to twenty trays, but they take up more space. With the higher-priced machines, it’s good to test them before you buy, or make sure you can return it if you don’t like it. Some of the more expensive models may be better suited to drying meats and fruits. That means they often have a higher level of heat output and stronger fans that may not be suitable for drying herbs (unless, of course, it also has a low setting specifically designed for herbs).
Resource Kitchen Krafts
PO?Box 442-HC01
Waukon, IA 52172-0442
(800) 776-0575 begin_of_the_skype_highlighting (800) 776-0575 end_of_the_skype_highlighting
www.kitchenkrafts.com
RECIPES Citrus and Lemon Verbena Body Splash Makes 2 cups
For a refreshing garden scent, spritz this blend on for a cooling sensation. If you prefer a stronger scent, consider adding 5 to 10 drops of orange, lemon, lime, and/or grapefruit essential oils.
Peel of 1 orange (preferably organic)
Peel of 1 lemon (preferably organic)
1 cup dried lemon verbena leaves
21/4 cups vodka
Place the orange peel, lemon peel, and dried lemon verbena in a quart-size glass jar. Slightly crush the peels and leaves to release their essential oils. Cover the plant material with the vodka. Steep for at least two weeks, shaking occasionally. Strain into a clean glass jar and discard the peels and herbs. Pour liquid into a glass spray bottle to use as a body splash, or add 1 cup to bath water for a refreshing wintertime bath. (Note: If essential oils are included, shake the bottle prior to each use to distribute them. If you have sensitive skin, do a skin patch test for sensitivity.) Store in the refrigerator and use within two months.
Spicy Licorice Tea Blend Makes 1 cup
While this recipe contains no licorice, the flavor contained in the following herbs is delightfully strong when they are crushed and combined.
2 teaspoons dried anise hyssop leaves, crushed
1 teaspoon dried fennel or anise seed, crushed
1 teaspoon whole allspice berries, crushed
Combine ingredients and place in a glass measuring cup. Cover with 1 cup of boiling water. Cover cup and steep for 3 to 5 minutes. Strain out herbs and spices. I enjoy this unsweetened, but you may want to add a bit of stevia or honey.
Calendula-Infused Oil Makes about 2 cups
This oil may be used directly on the skin as a base for salves and creams, as a carrier oil for essential oils, or as a massage oil. Apply directly to the face (or other parts of the body) or add up to 1 tablespoon to the bath to ease dry skin.
2 cups oil such as almond, olive, or jojoba
1 cup dried calendula flower petals
1 capsule vitamin E (400 IU)
Combine oil and dried calendula petals in a glass or stainless steel pot. Warm over low heat, being careful not to burn the oil. Heat for approximately 30 to 40 minutes. Cool and then strain. Discard the flowers. Add vitamin E as a preservative. Label with contents and date. Store in a dark pint-size bottle in the refrigerator. Use within six months.
Herbal Rub for Poultry Makes about 2 tablespoons
A great way to serve a tasty meal and make use of the dehydrated herbs from your garden is with these seasonings. The 2 tablespoons provides plenty of seasoning for a small chicken or other poultry as a main dish. Garnish with vegetables and enjoy.
1 tablespoon dried lemon thyme
1 teaspoon dried sage
1 teaspoon dried rosemary
1 teaspoon black pepper
1/2 teaspoon sea salt
1/4 teaspoon garlic powder
Slightly crush the herbs using a mortar and pestle. Combine all the ingredients and store in an airtight container. To use, wash the poultry and pat it dry. Lightly oil the surface. Sprinkle 1 to 2 tablespoons (to taste) per pound, and rub it in. Let stand loosely covered for 1 hour or more in the refrigerator before cooking.